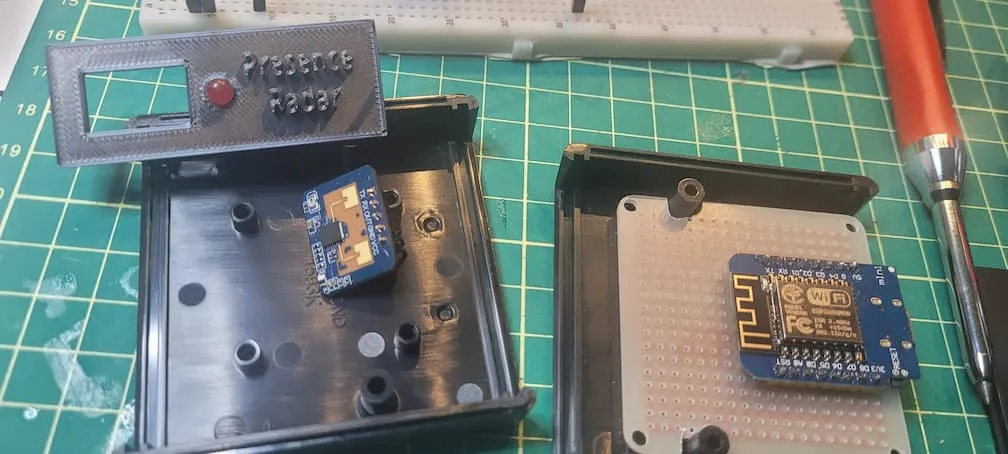
Mixed into this thought process is another topic for me to vent about – the dreaded move from breadboard to enclosure.
Here’s a breakdown of what makes mmWave radar so game-changing for Home Assistant, why local firmware triggers matter, and the absolute headache of stuffing it all into a box.
Why mmWave Leaves Old-School PIR in the Dust
If you’ve ever been sitting on the couch reading a book, only to have your smart lights turn off and leave you in the pitch dark, you already know the pain of Passive Infrared (PIR) motion sensors. PIR only cares about big movement across its field of view.
The HLK-LD2410 is a 24 GHz FMCW millimetre-wave radar sensor. Instead of looking for heat moving across a room, it bounces high-frequency radio waves off everything around it. It can pick up micro-movements like your chest rising and falling as you breathe.
• No more “ghosting” you: It splits tracking into moving_target and still_target. You get true presence detection, not just short-lived motion.
• Instant local feedback: By wiring an indicator LED directly to a clean GPIO pin on an old Wemos D1 Mini (ESP8266) and triggering it inside ESPHome rather than through Home Assistant, the light turns on instantly. No Wi-Fi lag, no network round-trips.
• Fully configurable: The LD2410 breaks space down into 9 distinct distance “gates.” You can dial in sensitivity per gate in Home Assistant to ignore that ceiling fan or those swaying curtains.
The Reality Check: From Breadboard to Enclosure
Let’s be honest: making the code work on a breadboard is only 30% of the project. The other 70% is the psychological battle of getting it permanently enclosed without breaking everything.
Everything works flawlessly on the bench when held together by loose Dupont wires. But the moment you fire up the soldering iron and try to pack an ESP8266, an LD2410 radar module, a resistor, and a status LED into a tiny 3D-printed or off-the-shelf plastic project box, the real fun starts:
[ Workbench Breadboard ] ──( 100% Reliable )──> [ Solder & Cram Into Small Box ] ──( Broken UART Connection )
• The UART Fragility: High-baud serial lines (running at 256,000 baud on hardware UART0) hate loose connections. A single stressed solder joint or pinched wire inside a cramped box will kill communication instantly—leaving you with an ESP node that boots fine over Wi-Fi, but a radar that stays dead silent.
• Pin Spacing & Strain Relief: Finding room for the LED wiring and resistor alongside the radar unit without shorting pins against the ESP board requires serious spatial reasoning (and plenty of heat shrink).
• Radar Placement: You have to mount the radar flush against the inside of the enclosure wall with zero metal interference, while making sure your LED is visible from the outside. I was ok to see the radar face on my enclosure so I 3dprinted a plate that framed the radar and the led.
For the coding I was also a bit confused when, during troubleshooting, I used an app (HLKRadarTool) that connects to the radar via Bluetooth, bypassing any other connection requirements. The app found the device and I could see it sensing but it was not showing up in ESPHome. There is Firmware version key in the ESPHome debug log (Firmware version:) If that is blank the setup fails for ESPHOME. In my case it was because I had the TX and RX wiring reversed.
What you can actually co with It in Home Assistant
Once you survive the hardware assembly and flash ESPHome, you can go to town with Home Assistant.
• “Still moving” automation Room Lights: Trigger room lights on motion, but keep them on indefinitely using still_target. They won’t turn off until you actually walk out of the room.
• Distance-Aware Automations: Because the LD2410 reports exact distance, you can set up actions that trigger only when you step right up to a desk or workbench, ignoring people just walking past the doorway.
The plan is to use this for when we first arrive as an “opening automation” – it will start small but here are some of the things that I could automate when we first arrive and in order of what might happen (after any external automations like landscape lights etc). Some situations will need an over-ride the actions like when I ask someone to enter the cottage breifly while I am away. So conditions and flags will be key.
Something like: If we sense presence and that presence persists for more than 5 seconds…
- Notify the owner
- Turn on main lights if it’s sundown
- Turn on the bunky path lights
- Chime some sort of welcom
- Bring up a list of items on the TV of things the first entry person(s) are to do to get the cottage started or maybe do this with voice
If we know there has been no movement for 2hrs turn off things we don’t need running like local lights and fans
The list goes on.
The fun part is figuring out how to deal with those unique scenarios for cottage automation. Think long periods of vacancy, weather events, fire ratings, camera activity, security, water management, heat management etc.